Showing posts with label how to make altered art jewelry. Show all posts

Thursday, March 22, 2012

DIY Cobalt Blue Glass Glaze Recipes for Mini Bottles, Crafting and Mason Jars

Our shipment of over 130 NEW lampwork glass beads and bali style pewter charms just arrived ~ click here to see them all!

We've been experimenting with making our own cobalt glass bottles, using a variety of craft glazes and food coloring with our mini bottles. We found a great tutorial on Pinterest for DIY amber glass mason jars, (BUT, since we already sell amber glass mini jars) we thought BLUE would be a good color to try! You cannot find blue corked super mini bottles anywhere but ... you CAN make your own!

The basic project is very easy - you can tint our mini bottles with a simple mixture of food coloring (5 to 10 drops per tablespoon of glaze.) Mix into your choice of Mod Podge Gloss or Weldbond with a few drops of water, or drop directly into a tablespoon of 3D Crystal Lacquer, or Ranger Glossy Accents . Heavy on the coloring - it will dry darker than when mixed! Super basic: Try a tablespoon of white glue thinned with 5-10 drops of blue food coloring.

Use a small dropper, teaspoon, chopstick and / or painbrush to coat the inside of your bottle. Swirl your mixture and roll the bottle around in every direction. Shake out the excess.

Quick dry these upside down on a piece of parchment paper in either your oven (200F), or microwave on LOW for 30 secs to 1 minute. Take them out with oven mitts and let them cool off completely.

Art effects: The microwave producedsome bubbles in the finish which are really interesting, actually WANTED if you're doing an ocean themed or mermaid project. Just add our screw eye pins to the corks and you've got some intriguing little conversation pieces! Let us know what you come up with!

SEE our all NEW lampwork glass beads 10 packs here! Affordably priced, mix and match, have enough matching pairs for your jewelry projects without having to purchase full strands!

Also, see our new Millefiori mosaic butterflies and Millefiori smorgy 15 inch FULL strands! Customer favorites now in full strands! Great for matching pairs, earrings, jewelry making!

Also, tons of new Bali Style Silver Pewter charm and Pendant 10 packs with LOTS of great spring themes ~ Sea shells, mermaids, trees, fish, more!

Also, an exciting NEW set of incredible creations from Tim Holtz, the king of cool. See our 3 PAGE LIST for April 12 ~ here ~ check pages 1, 2 and 3!

Save monthly! ~ make sure you're on our e-mail list. We send out 20% codes to our newsletter subscribers ONLY ~ click here to get on the list and start saving. Our codes are good for a whole month!

Thursday, March 8, 2012

Tuesday, August 2, 2011

DIY Typewriter Keys & Wistful Traveler's Jewelry + Freebie Download for You!


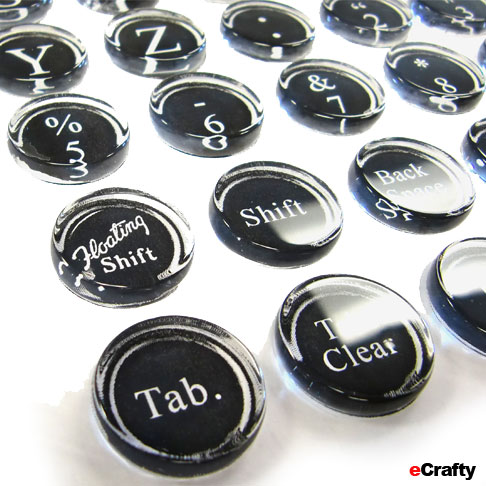
August FREEBIE Download Collage Sheet ~ Smith Corona style Typewriter KeysFREEBIE printable collage sheet download when you “LIKE” US on Facebook (click here)! If you're already a fan, you'll see the link here:


We've got a really great 
If you're not on Facebook, you can still get the same freebie - just refer a friend to our site here or sign up for our newsletter here, OR just e-us using this link or mention "collage sheet" in the subject!
Use these as we did for the jewelry samples below, or embellish our bamboo tiles. Great for scrapbooks.
These also make a killer set gift set of fridge magnets. Add our 1" pendant bases + instant adhesive domes - or print out slightly larger and punch out 1" circles too ~ use with our bottle cap pendants and magnets !
Make instant pendants, magnets, more! Add our epoxy domes, or e6000, 3D Crystal Lacquer + glass domes. Easier still, just stick down epoxy bubbles and trim. Done.
We hope you’re having a wonderful summer with some extra time to set aside for crafts and family.
Remember to use your subscriber savings code (type it on payment page after you've signed in - promo code box will appear) for 20% off your cart contents with your exclusive member savings code AUG2011 good thru 9/1!
Here's 3 fast and fun ideas for near instant art jewelry.  
We made our Typewriter key jewelry charms and Typewriter Key Finger Rings, as well as a Bahama Mama necklace using just a few of our newest charm blanks, domes and this month's freebie collage sheet download. (see below). Let's get started!
Plan ahead - attached to a charm bracelet or hung from a chain or ribbon, these make easy, fun & personalized holiday gifts.
1. Faux Typewriter Key Charms (click image above)
Our newest charm bases and matching domes just arrived - 18mm - dime size - just about typewriter key size - perfect for faux typewriter art jewelry.
2. Faux Typewriter Key Rings (click to enlarge)
Our finger rings and matching domes just arrived - 16mm - actual typewriter key size - perfect for faux typewriter art jewelry.
How to Make Typewriter Jewelry Using our Glass Domes and Charm bases:
1. Print this month's freebie typewriter collage sheet at 30% of actual size. 2. Add a small dollop of e6000 adhesive to printout. 3. Press glass dome down firmly for a thin, bubble-free seal. 4. Speed dry in your microwave (1 min, 10% power) or oven (250 degrees) briefly. 5. Trim around the glass edge with sharp scissors, 6. Dry fully. (Back in the oven or let sit overnight).  7. Glue your art dome into the rimmed base - perfect fit, perfectly finished charm! 
 3. Bahama Mama Necklace. I'd rather be in the Bahamas today, wouldn't you? Armchair travel your way around the globe with a custom armchair traveller charm.
Our new 1" thin-rimmed SP square bases with matching epoxy bubbles just arrived - I made fast use of them on this nearly instant project!
How to Make our Bahama Mama Necklace Using our Charm Bases and Epoxy Domes
1. Find a cool map scrap. (National Geographics are good). 2. Peel n stick our epoxy bubble on top. 3. Glue into charm base.(e6000, etc.)  4. Dry fully. (try a low-temp oven if you're in a hurry ~ like headed out the door trying to give as a gift!) 5. Embellish with our Mini Message Bottles, Starfish and Scallop Shell charms 6. Attach with jump rings onto one of our simple chains or cords.

Sunday, July 27, 2008

Top 5 Ways to Personalize Your Own Photo, Altered Art Jewelry

Happy summer! Happy crafting! I remember the year I got all of my holiday presents made by August - I had time on my hands, leisurely days - summer was a great time to take care of my special gift list. Here's some easy ideas for creative and personalized gifts

1. Photo Charms - Use just one dangling from a necklace, or get creative, customize several and make a one of a kind photo bracelet for Grandma or an altered art themed charm bracelet or customized wine charms set for a friend! I used color copies of old postage stamps for the charms above. Use our clear sealers to finish.

2. Memory Frames - no sealers, no muss, no fuss. Just place your photo or art or customized monogram between the glass inserts provided, snap shut and you're done. Reversible, two-sided wearable art. The look of a soldered art piece in about....a minute!

3. Photo (Brag) Bracelets, Keychains - OK, if you have a grandma in the family - you need one of these! Ready-made stretch bracelets with 6 photo frames complete with acetate covers. Or, simpler still, beautiful silver plated keychains with ornate frames and matching acetate covers. Cut out your images, place in frames, cover with acetate and you're done! Gift boxes included!

4. Made with Love, Made for You, Inspirational Word Charms - Enough said! Don't forget to seal it with love - we have some wonderful little word charms sure to add a special spark to anything you make!

5. Message in a (mini) Bottle Charms - A really fun and quick way to turn words, pictures, mementos, sand from your summer beach spot, mixed matsuno or crystal beads, etc. into wearable art! Display or hang on our cords in leather, organza, rubber, chain - see more here!