Friday, September 21, 2012

DIY Snow Globe Charms from eCrafty.com


DIY Snow Globe Charms from eCrafty.com!
We are busy preparing some great little gift ideas for you to make now for the gift giving season.
Mini Snowglobe Charms
By Anne Strasser


A customer product question prompted Anne to come up with these other day. They are just too adorable!
These are easy, FUN, and sure to put a smile on your face! These would be SO cute for a holiday gift making party, teacher gift or scout troop craft.
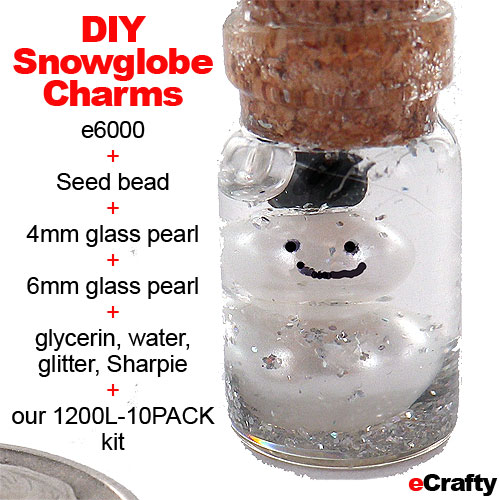
How to make our Mini Snow Globe Charms
Using our smallest mini bottles 1200L-10PACK KIT, she e6000'd (our waterproof adhesive) a black seed bead onto one of our 4mm pearls onto one 6mm pearls, to form a mini snowman. The little guy got a smile on his face with a black fine point sharpie.
When dry, she glued the little guy in place, inside one of our 1200L-10PACK mini bottles, and filled it almost to the rim with a mixture of glycerin, water and a little bit of glitter.
Spoiler alert. I am making these for EVERYBODY on my gift list! They are guaranteed to make you smile!
1200L-10PACK KIT $8.99 Buy Now 
e6000 Adhesive $3.99
Buy Now

Wednesday, September 19, 2012

DIY Mini Bottle Aquarium Charms Make Sweet Little Gifts!


Mini Bottle Imaginarium Aquarium Charms by Anne Strasser for eCrafty
Mini Bottle Imaginarium Aquarium Charms by Anne Strasser for eCrafty.com
Wow! Look what Anne just dreamed up with our newest jug-size mini glass bottles! What FUN gifts these would make! She combined several ideas into one cool themed creative set - combining snowglobe shaker style action with filled colored water and ocean themed charms. See our themed charms & pendants section for more inspiration and ideas!
She made these little treasures with our 1200V and 1200G series mini bottles, our eye pins, headpins, our 1507A and 1507L fish charms, some extra glitter, a few smaller beads or glass pearls, with a mixture of mainly glycerin (find it at your drug store), mixed with some water and a dash of food coloring to finish. Seal your liquid filled bottles with our e6000 adhesive around the base of the cork and let dry fully.
Other really fun ideas for these jug-shaped mini bottles include mini snowglobes, terrariums, planetariums, time out charms, picture or photo pendants, etc.
Send us pictures of your creations or ideas - we'll post yours or perhaps make them here and post for you to try!
There are SO many ideas for these jug style bottles - we've only just begun! The basic concept is the same -Convert these into instant pendants with our screw eye pins into cork top. Clear blown glass mini treasure bottles with cork stoppers for bead storage, interchangeable pendant art, message in a bottle charms, keepsake charms, momentos, altered art, travel treasures, more!
Make your own message in a bottle charms and altered art pendants, projects, party and wedding favors! Or store your seed and matsuno beads with ease! You can also convert these into instant pendants by wire wrapping too! Get creative with these little treasure keepers ~ watch out ~ once you start, it's hard to put them down! Happy creating!

Friday, September 14, 2012

More Holiday Make Ahead Crafts: DIY Beaded Crystal Snowflakes!


Look what Hannah dreamed up with our newest clear crystal beads, our eye pins, jump rings and a little 3D Crystal Lacquer!
I especially love that this project is very portable – you can bead up the individual pins just about anywhere – in front of your favorite TV show or Netflix movie, or at one of the kids’ practices, and finish them later. You might even get some help from envious bystanders! (This has happened to me at both kids’ swim lessons and at the orthodontist’s waiting room). There is no end to what friendly folks will volulnteer to help you with when there’s crafting going on! :-)
Hannah’s clear AB version below used all the same size beads(our SKU 1692B).
The basic technique is quite simple.
  1. Bead 1 eye pin, form loop at end. Repeat your pattern (Hannah’s design used 9-10 2″ pins).
  2. Complete each end with a simple loop (round-nosed plier are perfect for this).
  3. Lay out flat, test your pattern. If you are using several bead sizes, it helps to start with the largest beads toward the center.
  4. Open your jump ring like an “S”. Attach each on end of each pin loop to the jump ring, close the ring.
  5. Lay your finished piece flat on a non-stick (wax paper) or silicone cookie sheet.
  6. Secure your pattern with 3D Crystal Lacquer over the first “ring” of beads in the middle and over the central jump ring.
  7. Let air dry. You can speed the dry time along by baking in a low temp 250 oven for approx. 15 minutes.
Hannah learned a few lessons along the way – if the pins are beaded consistently, your snowflake should assemble quite easily.
You’ll notice in the gold version below, she used her largest beads toward the center of her design, and interspersed different sized clear spacers and crystals.

Click here to see ALL of our new arrivals!  Save 20% with your subscriber promo code SEP2012 on your payment page.  If you don’t see the promo code box at checkout, just E-us with the code or e-us with your ORDER number and code We’ll apply your 20% savings as a refund to you when your order ships.

Beaded snowflakes materials list:
1692A, 1602B crystal beads,
our eye pins,
 jump rings and
a little 3D Crystal Lacquer!
Another really great idea would be to use our Ivory Glass Pearls Mega Mix pack below!
3 strands – 2 1/2 feet per strand, or over 90 inches of gorgeous ivory pearls in 3 handy sizes – 4mm, 6mm and 8mm.
$6.99 Buy Now

Tuesday, September 11, 2012