
 Spring is just around the corner! In the spirit of spring cleaning, we made some Upcycled/Recycled Catalog and Junk Mail Jewelry. Click on any image for a closer view.
I used our flat round glass tiles 303F and pendant base 1239 to make this jewelry set from a colorful pizza restaurant mailer.
These same finished glass tiles can be used as on our bracelet forms 1442, fridge magnets, bottle caps, more!
 Anne finished one of our 412A 2" rectangle pendants/glass with a lovely cropped detail from her Sunday paper's Import store ad.
To finish any of our glass tiles, see our detailed instructions below.
Watch out - this is a VERY easy crafting project and once you start - you'll be looking at your recycling bin in a whole new way!
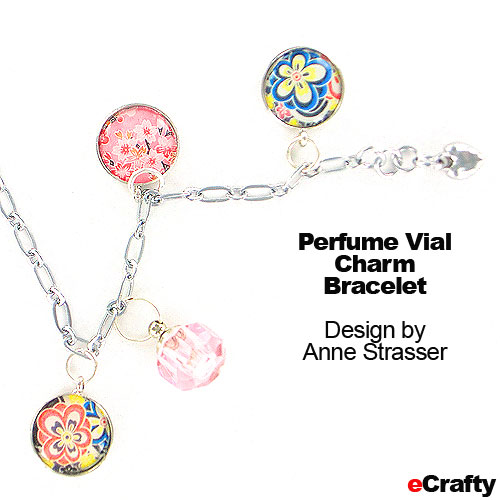 Secret Scent Charm Bracelet Here is a charm bracelet with a sweet little secret. The pretty pink bottle 1203C holds a little of Anne's favorite perfume. Opening it is instant aromatherapy! The little photo charms that dress it up a bit more are our 419A used with our 110 downloadable art and our 802B epoxy bubbles. HINT: Use different bottles for different perfumes and attach to this or any charm bracelet chain with our lobster clasps.
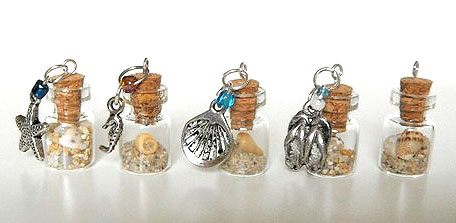 Tiny Beach in a Bottle Charms Anne crafted these adorable tiny beach charms to use for necklaces or earrings (they are less than an inch high). The shells and sand in the bottles shift around as you wear them. She stuck a trimmed eye pin in the cork ~ you could also use our eye screws - see kits on right of this page. The jump rings are 6mm. She added a few of our beach themed charms. Embellish with our Mini Message Bottles, Starfish and Scallop Shell charms 6. Attach with jump rings onto one of our simple chains or cords.Sand and shells picked up on the beach. Now they are ready to incorporate into your next charm bracelet or necklace project - they're tiny enough even for earrings!
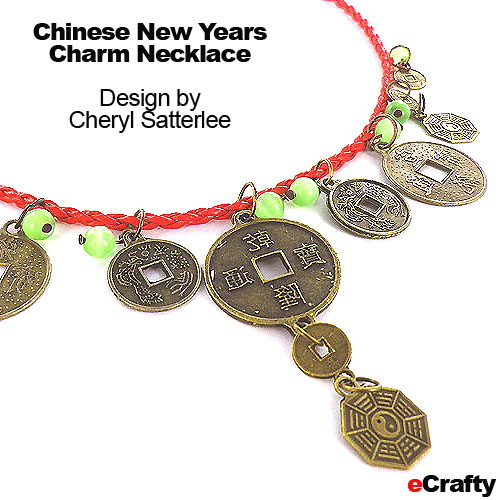 Happy Chinese New Years Jewelry Look what Cheryl dreamt up with our braided PU cords 368BD, some of our Asian Coin charms 634H, 634I, 634J etc., and a few green cats eye beads from our 1228 mix! Wow!
We have a LOT of new items ~ so remember to check our listings for FEB and MARCH.
For instance, we have some wonderful new HOW to beading books, as well as some really interesting shell beads which Anne made some lovely, quick beaded pendants.

Remember to use your newsletter promo code MAR2012 for 20% savings off all items in your cart!
In case you missed it - we have a sweet instant download Freebie for you! Our new Cherry Blossom alphabet - fit for 1" glass tiles and our small ovals.
![]() The light background works with either squares or circles. Open the file here - right click to "save as" to your computer. Your printer setting should be "fit to print" or print at 8.5x11 letter size. You can also import into MS Word and scale to letter size. Happy creating!Why do the best ideas seem to come at the last minute? I'm usually pacing while my glass tile art is drying. Sound familiar? Well, I've just crossed this last-minute frustation off of my list:
The light background works with either squares or circles. Open the file here - right click to "save as" to your computer. Your printer setting should be "fit to print" or print at 8.5x11 letter size. You can also import into MS Word and scale to letter size. Happy creating!Why do the best ideas seem to come at the last minute? I'm usually pacing while my glass tile art is drying. Sound familiar? Well, I've just crossed this last-minute frustation off of my list:
Here's how to stop ink jet art from running under glass domes and tiles while the sealer is curing..
The secret is as close as your microwave!

Take a few of our glass tiles or glass domes. Cover the back 1/2 the surface area with thin layer of 3D Crystal Lacquer. Press firmly onto your photo or print out and swirl lightly to get a thin seal, bubble free.
Microwave your sealed art (glass ONLY no metal) on low for 3 minutes. Repeat. Finish for a minute or two on medium.
Your customized glass tile will be fully dry and ready to glue into one of our many bezel cups, pendant, charm bases or key rings. You're done!
 To review, here's the magic steps to working with our favorite sealer, 3D Crystal Lacquer, for all of your glass tile and glass dome jewelry and craft projects:
Apply thin layer 3D Crystal Lacquer on center 1/2 to 2/3s of the back of the tile
Then do the smoosh down and swirl around to get a thin layer with no bubbles.
COOK them in the microwave on low, several rounds, several minutes.
This keeps the ink jet ink from saturating the paper and prevents running. (You can also use a warm oven set at 225 - 250).
Glue into our bezels, charm bases, pendant bases, key chain forms, or apply a magnet to the back with a small dollop of our e6000 craft adhesive.
 Glue into any of our charm, pendant bases or bezels with e6000 adhesive. Think ahead - great for Mother's Day and Father's Day! Easy for children to make!
No comments:
Post a Comment