Thursday, March 22, 2012

DIY Cobalt Blue Glass Glaze Recipes for Mini Bottles, Crafting and Mason Jars

Our shipment of over 130 NEW lampwork glass beads and bali style pewter charms just arrived ~ click here to see them all!

We've been experimenting with making our own cobalt glass bottles, using a variety of craft glazes and food coloring with our mini bottles. We found a great tutorial on Pinterest for DIY amber glass mason jars, (BUT, since we already sell amber glass mini jars) we thought BLUE would be a good color to try! You cannot find blue corked super mini bottles anywhere but ... you CAN make your own!

The basic project is very easy - you can tint our mini bottles with a simple mixture of food coloring (5 to 10 drops per tablespoon of glaze.) Mix into your choice of Mod Podge Gloss or Weldbond with a few drops of water, or drop directly into a tablespoon of 3D Crystal Lacquer, or Ranger Glossy Accents . Heavy on the coloring - it will dry darker than when mixed! Super basic: Try a tablespoon of white glue thinned with 5-10 drops of blue food coloring.

Use a small dropper, teaspoon, chopstick and / or painbrush to coat the inside of your bottle. Swirl your mixture and roll the bottle around in every direction. Shake out the excess.

Quick dry these upside down on a piece of parchment paper in either your oven (200F), or microwave on LOW for 30 secs to 1 minute. Take them out with oven mitts and let them cool off completely.

Art effects: The microwave producedsome bubbles in the finish which are really interesting, actually WANTED if you're doing an ocean themed or mermaid project. Just add our screw eye pins to the corks and you've got some intriguing little conversation pieces! Let us know what you come up with!

SEE our all NEW lampwork glass beads 10 packs here! Affordably priced, mix and match, have enough matching pairs for your jewelry projects without having to purchase full strands!

Also, see our new Millefiori mosaic butterflies and Millefiori smorgy 15 inch FULL strands! Customer favorites now in full strands! Great for matching pairs, earrings, jewelry making!

Also, tons of new Bali Style Silver Pewter charm and Pendant 10 packs with LOTS of great spring themes ~ Sea shells, mermaids, trees, fish, more!

Also, an exciting NEW set of incredible creations from Tim Holtz, the king of cool. See our 3 PAGE LIST for April 12 ~ here ~ check pages 1, 2 and 3!

Save monthly! ~ make sure you're on our e-mail list. We send out 20% codes to our newsletter subscribers ONLY ~ click here to get on the list and start saving. Our codes are good for a whole month!

Monday, March 12, 2012

Spring Ahead with our New Sea Glass Beads and Pendants!


WOW! We're bringing Spring Break to YOU this month! Our NEW Sea Glass Beads, Pendants and Spacers have arrived in lovely ocean hues. These beauties are tumbled, frosted beads and pendants made to mimic the tiny treasures you might find on your favorite windswept beach., Click here to see ALL of our new Sea Glass Beach Glass arrivals! Save 20% with your subscriber promo code MAR2012 on your payment page. If you don't see the promo code box at checkout, just E-us with the code or e-us with your ORDER number and code We'll apply your 20% savings as a refund to you when your order ships.

$1 Glass Pearls 32" Strands, Limited Time Only!
$1 Pearl Sale - All 32" Strands on SALE for a very limited time! Click here to see them all - this is nearly 1 YARD of pre-strung glass pearl beads - top quality! Get them while they last! The rest are headed over to our Amazon warehouse soon!

New Abalone Bead Strands in Aqua, Cobalt and Bronze! Abalone, paua shell beads, pendants. 24pc. 15mm (approx 1/2") each. Gorgeous irridescent real mother of pearl shell beads in a rainbow of colors. Lightweight - perfect for earrings, necklaces, bracelets, pendants, unique focals. Each bead will vary from one to the next in texture and finish. Expect variances and irregularity - compliments of Mother Nature!

Thursday, March 8, 2012

Thursday, February 23, 2012

DIY Jewelry Projects from your Recycling Bin + Perfume Sampler Charm Bracelet, More!

Spring is just around the corner! In the spirit of spring cleaning, we made some Upcycled/Recycled Catalog and Junk Mail Jewelry.  Click on any image for a closer view.

I used our flat round glass tiles 303F and pendant base 1239 to make this jewelry set from a colorful pizza restaurant mailer.

These same finished glass tiles can be used as on our bracelet forms 1442, fridge magnets, bottle caps, more!

Anne finished one of our 412A 2" rectangle pendants/glass with a lovely cropped detail from her Sunday paper's Import store ad.

To finish any of our glass tiles, see our detailed instructions below.

Watch out - this is a VERY easy crafting project and once you start - you'll be looking at your recycling bin in a whole new way!

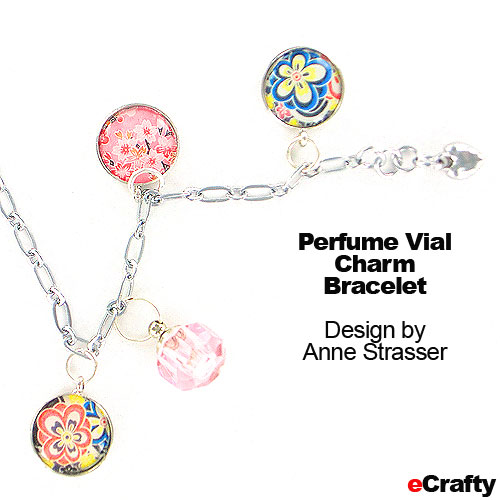
Secret Scent Charm Bracelet Here is a charm bracelet with a sweet little secret. The pretty pink bottle 1203C holds a little of Anne's favorite perfume. Opening it is instant aromatherapy! The little photo charms that dress it up a bit more are our 419A used with our 110 downloadable art and our 802B epoxy bubbles. HINT: Use different bottles for different perfumes and attach to this or any charm bracelet chain with our lobster clasps.

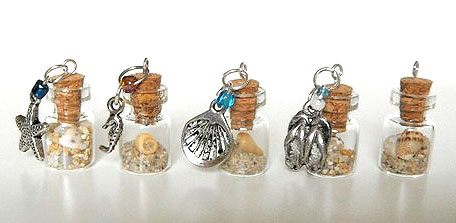
Tiny Beach in a Bottle Charms Anne crafted these adorable tiny beach charms to use for necklaces or earrings (they are less than an inch high). The shells and sand in the bottles shift around as you wear them. She stuck a trimmed eye pin in the cork ~ you could also use our eye screws - see kits on right of this page. The jump rings are 6mm. She added a few of our beach themed charms. Embellish with our Mini Message Bottles, Starfish and Scallop Shell charms 6. Attach with jump rings onto one of our simple chains or cords.Sand and shells picked up on the beach. Now they are ready to incorporate into your next charm bracelet or necklace project - they're tiny enough even for earrings!

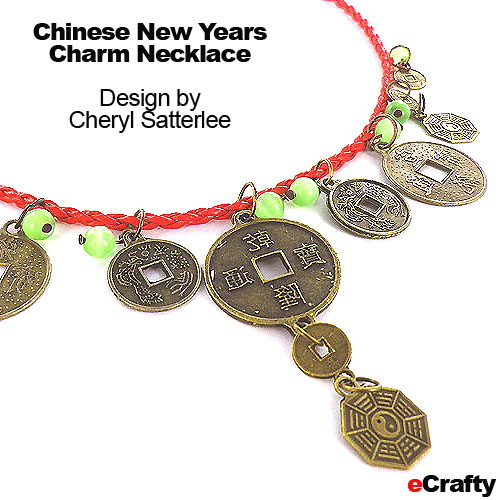
Happy Chinese New Years Jewelry Look what Cheryl dreamt up with our braided PU cords 368BD, some of our Asian Coin charms 634H, 634I, 634J etc., and a few green cats eye beads from our 1228 mix! Wow!

We have a LOT of new items ~ so remember to check our listings for FEB and MARCH.

For instance, we have some wonderful new HOW to beading books, as well as some really interesting shell beads which Anne made some lovely, quick beaded pendants.

Remember to use your newsletter promo code MAR2012 for 20% savings off all items in your cart!

 In case you missed it - we have a sweet instant download  Freebie for you!  Our new Cherry Blossom alphabet - fit for 1" glass tiles and our small ovals.

The light background works with either squares or circles. Open the file here - right click to "save as" to your computer. Your printer setting should be "fit to print" or print at 8.5x11 letter size. You can also import into MS Word and scale to letter size. Happy creating!Why do the best ideas seem to come at the last minute?  I'm usually pacing while my glass tile art is drying. Sound familiar? Well, I've just crossed this last-minute frustation off of my list:

Here's how to stop ink jet art from running under glass domes and tiles while the sealer is curing..

The secret is as close as your microwave!

Take a few of our glass tiles or glass domes. Cover the back 1/2 the surface area with thin layer of 3D Crystal Lacquer. Press firmly onto your photo or print out and swirl lightly to get a thin seal, bubble free.

 Microwave your sealed art (glass ONLY no metal) on low for 3 minutes. Repeat. Finish for a minute or two on medium.

Your customized glass tile will be fully dry and ready to glue into one of our many bezel cups, pendant, charm bases or key rings. You're done!

To review, here's the magic steps to working with our favorite sealer, 3D Crystal Lacquer, for all of your glass tile and glass dome jewelry and craft projects:


  • Apply thin layer 3D Crystal Lacquer on center 1/2 to 2/3s of the back of the tile

  • Then do the smoosh down and swirl around to get a thin layer with no bubbles.

  • COOK them in the microwave on low, several rounds, several minutes.

  • This keeps the ink jet ink from saturating the paper and prevents running. (You can also use a warm oven set at 225 - 250).

  • Glue into our bezels, charm bases, pendant bases, key chain forms, or apply a magnet to the back with a small dollop of our e6000 craft adhesive.


    Glue into any of our charm, pendant bases or bezels with e6000 adhesive. Think ahead - great for Mother's Day and Father's Day! Easy for children to make!
      

Thursday, January 26, 2012

Microwave Your Way to Quick and Easy Glass Tile Jewelry + FREEBIE Cherry Blossoms Alphabet

Love is in the air and we have a sweet FEB Freebie for you! Our new Cherry Blossom alphabet - fit for 1" glass tiles and our small ovals. The light background works with either squares or circles. Open the file here - right click to "save as" to your computer. Your printer setting should be "fit to print" or print at 8.5x11 letter size. You can also import into MS Word and scale to letter size. Happy creating!

Here's some great quick crafts using some of our 60 + NEW items for Jan/Feb!

We also have a section devoted to Valentines. you enjoy these tips!

My best ideas seem to come to me at the last minute. So, I'm usually pacing while my glass tile art is drying. Sound familiar? Well, I've just crossed this last-minute frustation off of my list:

Here's how to stop ink jet art from running under glass domes and tiles while the sealer is curing..

The secret is as close as your microwave!

Take a few of our glass tiles or glass domes. Cover the back 1/2 the surface area with thin layer of 3D Crystal Lacquer. Press firmly onto your photo or print out and swirl lightly to get a thin seal, bubble free.

Microwave your sealed art (glass ONLY no metal) on low for 3 minutes. Repeat. Finish for a minute or two on medium.

Your customized glass tile will be fully dry and ready to glue into one of our many bezel cups, pendant, charm bases or key rings. You're done!

To review, here's the magic steps to working with our favorite sealer, 3D Crystal Lacquer, for all of your glass tile and glass dome jewelry and craft projects:


  • Apply thin layer 3D Crystal Lacquer on center 1/2 to 2/3s of the back of the tile

  • Then do the smoosh down and swirl around to get a thin layer with no bubbles.

  • COOK them in the microwave on low, several rounds, several minutes.

  • This keeps the ink jet ink from saturating the paper and prevents running.

  • Glue into our bezels, charm bases, pendant bases, key chain forms, or apply a magnet to the back with a small dollop of our e6000 craft adhesive.
    Glue into any of our charm, pendant bases or bezels with e6000 adhesive. Think ahead - great for Mother's Day and Father's Day! Easy for children to make!

Tuesday, November 29, 2011

5 Creative & Quick DIY Gifts + FREEBIE Holiday Cheer Download Art for You!

Happy holidays! Our gift to you ~ our Dec 11 Holiday Cheer Circles FREEBIE download sheet. Download the page, save to your computer, (right click, choose "save picture as"), open, print out full size (letter) for festive 1" circles, or reduce, enlarge as you'd like.
With just this one sheet, you can easily make bottle cap pendants, bottle cap fridge mags, bracelets, glass domed art pendants, epoxy circle instant bracelets, ornaments, wrapping paper, tags & more! See our samples below, and as always, happy crafting!
Click here for our HOLIDAY CHEER CIRCLES download file. It is in .jpg format and will be HUGE on your screen. Right click with your mouse and save to your computer. Ask your printer to print letter size, or 8.5" wide.
Here's 5 quick and creative little gifts for you to try:
1. Magnetic Bottle Cap Pendants Made from fridge mags! Our 1" epoxy circles and 1" glass domes fit perfectly on the back of our double sided adhesive flat circle magnets. Peel n stick, pop the finished dome in our bottle cap pendants (inside or outside) and you've got an instant, interchangeable bottle cap pendant necklace. When you get home, you can put it back on the fridge or on your jewelry organizer! :-)
2. Glass Domes for Pendants and Ornaments. We are now well-stocked in all sizes and shapes of glass domes, cabochons, and matching pendant bases.
Take a peek - a little dab of e6000 or 3D Crystal Lacquer is all you need to take your printouts, scraps, family photos or collage art to a new wearable (or fridge-magnet) level! Great gifts, fun for kids too!
You can see them all here.Try making this nearly instant zipper pull – from one of our 100D kits - each flattened bottle cap charm comes with it's own adhesive dome and jump ring attached – ready for your art, photos, more. Add a lobster clasp and you've got a zipper or backpack pull. Finish your image with a 1" circle punch or exacto knife on a cutting mat.
3. Glass Dome Pendants become Key Chains with just a Key Ring!
Use one of our411 Silver Pendants with Glass Dome tops, add one of our Key Rings, and use our download sheet or your favorite photo - you've created a very easy (and sturdy) gift!
Wrap them up in our 10-pack gift bags - put together a whole bunch of family gifts with just a little bit of time, easy on the wallet too!

4. Epoxy Domed Zipper/Backpack Pulls.

Start with 1 of our 100D Flattened Bottle Caps w/Epoxy Dome cover, add a lobster clasp to the jump ring, and you've got an instant zipper pull or backpack hang tab.

4. Blossoms of Red & Green Necklace Get in the Holiday spirit with this necklace using our Millefiori Single Flower Glass Beads. These 12mm beads are cut out in single flower shapes in a rainbow of colors. You might also try our Millefiori Stars or Millefiori Mixes. For this project, Cheryl chose the red flowers and green flowers only out of the 30 beads on a strand. Combined with red, green and clear seed beads as well as bright silver ridged spacer beads, Cheryl has created a very festive necklace. She chose to make her design in a matinee length at about 22 inches. We are sure you will be inspired to make your own holiday creations to enjoy this party season.
5. Fridge Mag Snow Globes! Featuring your family and friends! Just add your photo or last year's holiday card to the back of our magnetic fridge mag snow globesfor instant personalized results!Try our matching mini photo tags - we now offer a double sided blank -perfect for reversible or two-sided charms and pendants- one of our most frequent customer requests.Wrap it all up with our 10 pack gift bags! ~ Choose from Velveeteen Opaque (no peeking!) or etherial Organza Bags ~ easy on the pocket book and easy on the eyes! Makes gift giving a breeze.

Don't forget to use your newsletter subscriber code DEC2011 at checkout. You will need to be signed in and enter your savings code on the payment/last page of checkout in the promo code box.
E-us for help with DEC2011 in the subject line and we can apply your savings in the form of a refund when your order ships.
Thanks always ~ wishing you a fun and happy holiday season filled with lots of family, friends, and crafts! From all of us at Rubber Nation Crafts and very soon at eCrafty.com

Saturday, November 5, 2011

5 Quick DIY Gifts, Host an Earring or Wine Charm Party, Freebie Cropping Tool Download

We have a whopping 125 new items - new bead mixes, strands, findings, adhesives - click here Oct and here Nov to see them all. Shown: last year's customer favorites just restocked: Little magnetic photo snow globes!
 
Our gift to you our wonderful customers and newsletter subscribers take 20% everything in your cart with your code NOV2011 in the promo code box on payment page. 
 
Our clickable supply list will help you make nearly instant gifts:
 
 
We also stock double-sided 1" adhesive squares , tons of neck cords and neck chains as well as bracelets and jump rings to make your project truly instant. Just trim your photo, printout or photocopy, peel, stick, wrap (try our gorgeous organza bags or gift tins) and give!
 
Here's some simple tips and links to make your photo gifts better:
 
Recycle last year's photo holiday cards - Yours, family members, friends'. Use a tight crop so that you see your subject's face - not a whole bunch of other things. Many times - larger photos are already the right size since what you're trying to crop or frame is a face that is between 2/3 to 1.25".

Free online photo cropping tool! If you need to reduce or enlarge your photo, try Google's FREE online tool ~ go to http://pixlr.com/ You do NOT have to download any software - you can work online, add any image, crop, shrink and print! If you have Microsoft Word - just copy your photo and open a new document. Insert your photo. Grab or click on the corners, crop or trim, and print.

Photo labs at your local drugstore or office supplies superstore -  You can also go to your local photo copy center, sometimes even your local grocery store has a photo kiosk, and have them help you make the reduction you need. Just measure the acetate insert and take in your photo - they can print out a sheet for you.

It's easy to shrink your image! Work in fractions,divide, find your desired reduction. For instance: You need your photo to be 1", your original is 3" - 1 divided by 3 is ....33% - you will need to print out your oriignal at 33%. You can do this with any set of measurements easily!

Our photo bracelets and mini memory frame charms have acetate inserts in each of the frames - if you take out one of the inserts - you can use that to place over your photograph and trim to size.

Our Recipe for an Easy Holiday Crafting Party:

Here's what's great about earrings and wine charms - anyone can make a pair or a set to take home - especially beginners!  With very few supplies, your guests can leave with their own handmade party favors!

Earring Crafting Party: Take 1 set of our 100pc ear wires, 1 set mixed crystal bicones, combine with 1 set 10pc assorted millefiori bead strands, add 1 set of our headpins, eyepins, jumprings assortment, and you've got a recipe for fun!

Holiday Wine Charm Crafting Party:  Take a set of our ribbon photo charms or memory frame minis, 1 set of our jump ring mega mix, a sheet or two of our laminating film, some simple adhesive squares, and just about any 1" art you'd like. Our friend and coworker Anne made these with artwork from return address labels.

OK! Now get to it!  Remember to reward yourself with a 20% discount on all items in your cart with the code NOV2011 in the promo code box on your payment page. Thanks always and happy creating from all of the folks at Rubber Nation Crafts, RubberNation.com and soon, eCrafty.com

As always, e-us with any questions: rubbernation@comcast.net Happy creations!